
It’s the little-image-format-that-could; despite being over 30 years old, animated GIFs continue to show up everywhere. The ability to pack a series of animated images into one single, simple file (giving you the potential to tell a story and/or present multiple messages) is something we collectively just can’t seem to quit.
No matter how you choose to pronounce it (I vote for the hard G, like “gift”), you’ll encounter them as banner ads, in e-blasts and blogs, and as reaction memes on almost every major social media site and communication app. Crucially, they require no plugins or external player, and can be looped infinitely anywhere they can be posted – features you still won’t often find with actual video files.
You can create an animated GIF from pretty much anything that moves, or can be made to move. There are countless sites that allow you to upload video clips and add your own customized text to create your own memes. Here is a GIF you can make with a site called Giphy:
Source: Giphy
But hey, you’re here because you’re a creator, right? When you’re looking to do more than just add some clever text over a tv or movie clip, After Effects (an app actually only slightly younger than the GIF format!) is an excellent place to let your creativity run wild.
My hope is that this will help you learn how to make your own GIFS and it will encourage you to submit to Wipster’s Looping GIF competition to win over $5,000 worth of video prizes.
If you’re new to Wipster, it’s a creative feedback platform that enables you to share and review videos, designs, gifs, mockups and other creative projects. You can sign up for a free 5GB Wipster account to see how it works.
Now, let’s get into the SpeGIFics.
Technical SpeGIFics
GIF is actually not a particularly efficient image format, and most sites or apps that allow them will limit the size of multimedia files you can upload. Because of this, they tend to be short, and will usually look best when created with well-defined edges and a limited color palette (GIF only supports 256 colors). Since this is technically an image file, there’s no way to add audio.
That said, being forced to work with technical restrictions can often lead to some great creative solutions. The lack of audio means you need to let the visuals do all the storytelling. The short format means you probably need to reduce your idea down to its simplest form. Can you find a way to make the loop be an essential component of your idea, and will that loop be noticeable or totally seamless?
One of the most important things to determine before you begin is where and how this GIF will be used/posted, since that will determine acceptable frame sizes and how large your GIF file can be. While many sites will technically accept a full-HD frame or larger, you’ll likely want to keep your frame size smaller to help reduce file size. 600px is typically the smallest you’ll want per side, unless you’re intentionally going for a very tall or very wide image. If you’re creating this for posting to a specific social media site, it’s best to search for those specs before starting (and they seem to change every few years). If you’re creating it for a specific client, make sure to confirm those dimensions and file sizes with them before getting started.
Your choice of frame rate is another way to keep file size down, but can also be used for creative effect. Smooth motion requires higher frame rates like 24 or 30, but if you’re after a more stop-motion or jerky look, you might be able to go down into single digits of frames-per-second.
After Effects is extremely flexible for both of these, but you’ll still want to plan accordingly. You can lower the frame size or frame rate during exporting, or by placing your composition into another composition with different settings – but making sure it’s consistent with what you originally built is still the key. For example, the Composition Settings pop-up allows you to lock the aspect ratio of your frame size; you can use this to see the sizes you can potentially end up with while retaining the same aspect ratio.

You definitely don’t want to work WAY bigger than you need to be, but it’s good to keep in mind that you can always scale down, but trying to make more pixels than you started with is usually asking for trouble.
What’s Your Idea?
All this technical stuff is clearly important, but won’t matter at all if your animation isn’t based on an interesting concept. Why are you making this GIF? Are you telling a story about your life? Promoting something? Trying out a new technique? Just telling a clever visual joke?
Before diving in, take the time to plan your project, just like any other. Figure out the major points of your idea and get them roughed in, to see how everything flows.
In my case, I decided to make an encouraging message to include at the end of this article. I’d like to use some After Effects imagery and a short message, keep things simple and clean, and stay within Wipster’s established visual guidelines. Something like this:

Idea mockup 1

Idea mockup 2
I’ve already got an easy loop point with the closed keyframe. I’ll probably have some fun animation opportunities when it opens & closes, and when I’m emphasizing the text.
The actual process of animating your idea will obviously depend greatly on what you’re making, so there’s only so much help I can give you there. Remember that you’re probably looking to grab people’s attention, so keep things moving, and look for any opportunities to add little flourishes. If you’re looking for some more guidance about actually animating in After Effects, some of these articles might be a good place to start!
Make The Perfect Loop
I usually aim to make my loops seamless whenever possible. Having elements start and end in the same place is the obvious first step, but here are a few tips that can help make those loops easier.
-
Confirm your Preview settings. Ensure that your previews will be looping (1 – this is the default), that you’re previewing the entire work area (2) and that you’re viewing things at the correct frame rate (3).

-
Make use of the Work Area! Keep in mind that you can always adjust the portion of your composition that will be shown during preview. This also dictates what will be exported, unless you specifically dive into your settings and change that. You can drag the ends of this bar with your mouse, or use the hotkeys B (Beginning) and N (End) to adjust the length of your Work Area to help get that loop perfect. If you want to leave yourself some reminders about where your start/end should be set, you can create markers (Press *, or use Shift + the numbers at the top of your keyboard to create numbered markers).

-
If you’re looking to cleanly “reset” something to its starting position to create a constant motion as the GIF loops, you actually need to place your final keyframe one frame beyond the end of your work area. If it’s placed at the last visible frame, you’ll actually be seeing that value twice during the loop, and you’ll end up with a slight ‘hitch” in the motion, as shown here:


-
Some effects have Evolution controls, and several of those can even be looped perfectly with very little effort. Keep an eye out for “Evolution Options” within your effects controls, and if there’s a checkbox for “Cycle Evolution,” you’ll be able to create perfect loops, even with flowy/organic effects, as shown here with Roughen Edges:

-
While most GIF compositions will be short, sometimes it gets a little tiresome to preview the entire thing if you’re just trying to work on that perfect loop point. Try dropping your current comp onto the New Composition icon (this will create it with all the same specs, with your original nested inside).

-
Now create a duplicate of your composition-as-layer inside this new comp. Offset the timing so the end of one matches up with the beginning of the other, and now you’ve got a great little preview of only the region right around your loop point. Fine-tune to your heart’s content.

-
For bonus points, you can use this same technique to add complexity to your overall loop – try offsetting some of your elements like this, so you don’t have everything looping on exactly the same frame.
Export Your GIF
Now it’s time to export your masterpiece! After Effects can’t export GIFs directly, but Adobe provides another app specifically for the purpose of exporting a wider range of formats: Adobe Media Encoder.
With your desired composition selected, choose Composition > Add to Adobe Media Encoder Queue (Shortcut: Ctrl+Alt+M (Win) or Cmd+Opt+M (Mac)).

If you’ve already added your composition (or multiple compositions) to the After Effects Render Queue, there’s a handy button to send the entire batch over to Media Encoder.

Either way, you should see the Media Encoder splash screen fire up, and within a few seconds, you’ll be looking at something very similar to the Render Queue in After Effects. Media Encoder will assume you want the last-used preset – if that’s something other than Animated GIF, you just need to choose it here in the Format column.

If you find yourself needing to tinker with quality settings, you can click directly on the Preset, and you’ll be given a few options to adjust quality, frame rate, etc.

Unless you’re struggling to bring your GIF down to a specific file size, it’s usually best to start with the defaults.
Reducing frame rate is the best way to reduce file size (you’re literally reducing the number of images held in the GIF container), but will obviously start reducing the smoothness of your animation as it decreases. When reducing frame rate, make sure to use another frame rate with a common denominator; if you animated at 24, try 12, 8, or 6. If you need options that Media Encoder’s settings don’t provide, you’ll need to go back to After Effects, make those changes to your Composition settings in there, and re-send to Media Encoder.
You will often be able to get away with reducing the visual quality a bit, but it can quickly start making things blocky/chunky, especially with more complex visuals. It’s typically best to try shaving off small amounts at a time, and do a few trial-and-error exports until you hit that magic size number you’re after.
If you’ve tried reducing the frame rate and quality, and still can’t get your file to an acceptable size without it looking like a jumpy, blocky mess, it might be time to rethink how much content you’re trying to pack into this little container.
If you plan to be creating a lot of GIFs in After Effects, it may even be worth investing in a third-party tool like GifGun. It allows you to export GIFs directly from the After Effects interface, and provides more control over quality options without having to dive into quite so many menus.
Show It To The World
Now it’s time to get your GIF posted – how else will everyone appreciate all your hard work? You can add them directly to blogs or websites, include them in your Facebook or Twitter posts (Instagram does not support GIFs, FYI), post them to sites like Giphy to make them accessible as reaction images, or send them directly to friends using communication apps.
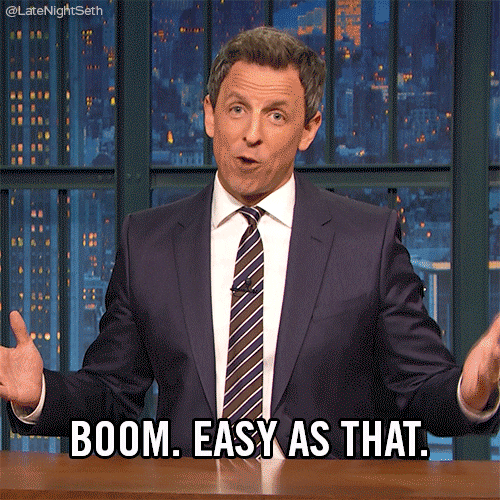
Oh yeah – you were probably wanting some payoff for that concept I started up there. Now that you’ve made it through this article, it’s time to send you off with a little encouragement, so here we are:

Right now, your GIF skills could win over $5,000 in amazing video prizes! Check out some of the other awesome entries we’ve gotten, and enter your creation in Wipster’s Looping GIF Competition today! We can’t wait to see all your amazing ideas come to (loopable) life!
Enter the Wipster GIF Competition
* This article was originally published here